How To Adjust And Maintain Bicycle Brakes

Learn to adjust bicycle brakes with our comprehensive guide covering rim, disc, and drum brakes. Enhance safety and performance today.
*This article may contain affiliate ads that help to support this site*
Your safety and the performance of your bike go hand in hand, and nothing plays a more pivotal role in both than your bicycle brakes. Properly adjusted brakes are essential to maintain control, prevent accidents, and enjoy a smooth ride. Whether you’re a seasoned cyclist or a beginner, understanding how to adjust and maintian your bicycle brakes is a fundamental skill every rider should possess.
In this comprehensive guide, we will walk you through the intricacies of adjusting various types of bicycle brakes, from traditional rim brakes to modern disc and drum brakes. With the right tools, materials, and a bit of know-how, you’ll be well-equipped to keep your brakes in optimal condition, ensuring a safer and more enjoyable cycling experience. So, let’s roll up our sleeves and dive into the world of bicycle brake adjustment. Your bike and your safety will thank you for it.
Types Of Bicycle Brakes
Bicycle brakes come in various designs, each with its unique features and advantages. Understanding the type of brakes on your bike is the first step towards successful brake adjustment. Here are some of the most common types:
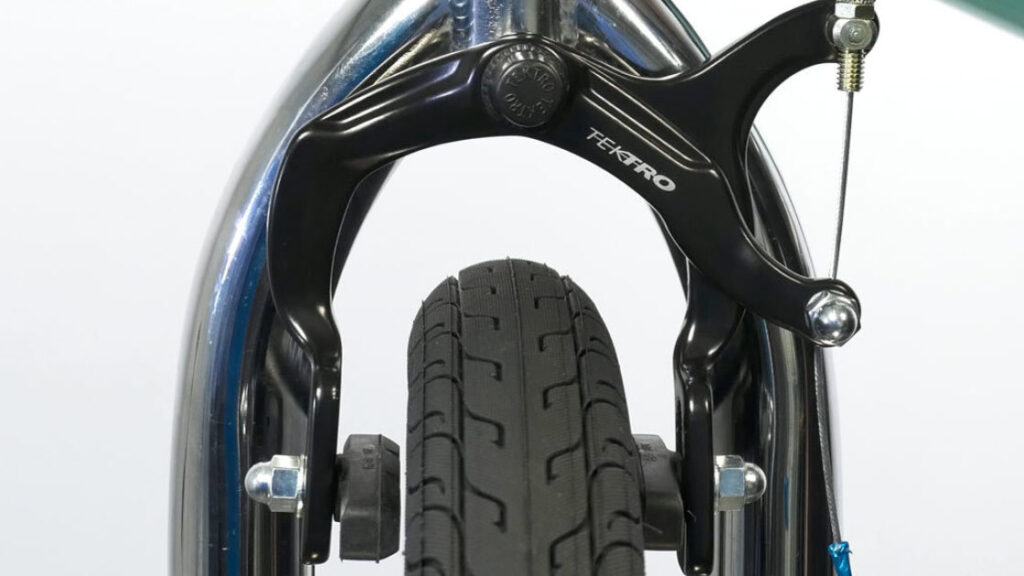
1) Rim Brakes: Rim brakes, including caliper and V-brakes, are the traditional and straightforward choice for many bicycles. They work by squeezing brake pads against the wheel’s rim. These brakes are easy to adjust and maintain. Adjusting rim brakes typically involves aligning brake pads with the rim and adjusting cable tension. These brakes are known for their lightweight and simplicity.
2) Disc Brakes: Disc brakes have become increasingly popular, especially in mountain biking and high-performance road cycling. They use a rotor attached to the wheel hub and a caliper that clamps down on it. Disc brakes offer superior stopping power and perform well in various weather conditions. Adjusting disc brakes involves caliper alignment, pad replacement, and rotor inspection.
3) Drum Brakes: Drum brakes are often found on utility and cruiser bikes. They use enclosed, drum-shaped hubs that contain brake shoes. Adjusting drum brakes requires disassembly and reassembly of the hub to inspect brake shoes and ensure proper tension.
Understanding the type of brakes on your bike is the first step in maintaining and adjusting them effectively. In the following sections, we will delve into the specifics of adjusting each type, allowing you to keep your brakes in optimal condition for a safe and enjoyable ride.
Gather Necessary Tools And Supplies
Before you start adjusting your bicycle brakes, it’s crucial to ensure you have the right tools and supplies at your disposal. Having the correct equipment makes the adjustment process more manageable and helps achieve better results. Here’s a list of the essential tools and materials you’ll need:
Tools:
Allen Wrenches: Various sizes of Allen wrenches are essential for loosening and tightening brake components. Make sure to have a set that matches the sizes commonly used on your bike.
Cable Cutters: To trim and shape brake cables cleanly and precisely.
Adjustable Wrench: Useful for securing and loosening nuts and bolts, especially on older-style brake calipers.
Screwdrivers: Both flathead and Phillips screwdrivers can be handy for various brake adjustments and fine-tuning.
Supplies:
Brake Cable and Housing: In case your existing cables are worn or damaged, having spare cable and housing on hand can be a lifesaver.
Lubricant: A high-quality bike-specific lubricant is essential for keeping moving parts, like pivot points and cables, in good working order.
Brake Pads: If your brake pads are worn down or damaged, having replacement pads ready will ensure your brakes work effectively.
Rag or Paper Towels: To wipe down and clean brake components during the adjustment process.
By having these tools and supplies on hand, you’ll be well-prepared for any brake adjustment task. Proper preparation ensures a smoother, more efficient adjustment process and helps keep your brakes in top-notch condition. In the upcoming sections, we’ll guide you through the step-by-step process of adjusting different types of bicycle brakes, so you can ride with confidence and safety.
Preparing Your Bike
Before you dive into adjusting your bicycle brakes, it’s essential to ensure your bike is properly prepared. A well-prepared bike makes the adjustment process smoother and safer. Here are some key steps to follow:
1) Choose a Suitable Location: Find a stable and well-lit area to work on your bike. If possible, use a bike stand to elevate your bicycle. If you don’t have a stand, you can turn your bike upside down, supporting it by the handlebars and saddle.
2) Safety First: Ensure that your work area is safe and free from any obstacles or hazards. Wear safety glasses and gloves to protect your eyes and hands. It’s also a good idea to have a first-aid kit nearby in case of any accidents.
3) Check the Braking System: Before making any adjustments, give your brakes a test. Squeeze the brake levers to ensure they are functioning. If your brakes are excessively loose, tight, or make unusual noises, you know you have adjustments to make.
4) Inspect the Brake Pads: Examine the brake pads for wear and tear. Look for any signs of contamination, such as oil or debris, on the pads or rims (for rim brakes) or rotors (for disc brakes). Replace any damaged or worn pads.
5) Lubricate Moving Parts: Apply lubricant to pivot points and moving parts, such as the brake caliper pivots and cable tension points, to ensure smooth operation of the brake.
By preparing your bike properly, you set the stage for a successful brake adjustment process. Once your bike is ready, you can move on to the specific adjustment procedures for the type of brakes on your bicycle, which we’ll cover in the following sections. This ensures that your bike is safe and ready for the road.

Hide A Bike Kit
Is your garage starting to become a mess? Save space by storing your bikes flat against the ceiling.
Adjusting Rim Brakes
Rim brakes are a common type of bicycle brake that work by pressing brake pads against the wheel’s rim to slow down or stop the bike. Proper adjustment of rim brakes is crucial for maintaining effective braking performance. Here’s a step-by-step guide on how to adjust them:
1) Brake Pad Alignment: Start by checking the alignment of the brake pads. They should make even contact with the rim’s braking surface. Loosen the bolt that secures the brake pad and adjust its position until it aligns perfectly with the rim. Make sure both brake pads are evenly positioned.
2) Cable Tension: Check the cable tension. If the brake lever feels too loose or tight, you can adjust it. Locate the barrel adjuster on the brake lever or brake caliper. Turn it clockwise to increase tension or counterclockwise to decrease tension until the lever feels comfortable.
3) Pad Clearance: Ensure there’s proper clearance between the brake pad and the rim. You should have about 1-2mm of space between the pad and the rim. If the pad is too close, it may rub against the rim, causing unnecessary wear and reduced braking efficiency.
4) Toe-In Adjustment: For smoother braking and to prevent squealing, you can set a slight toe-in on the brake pads. This means the front part of the pad contacts the rim slightly before the rear. Loosen the pad bolt, angle the pad, and then retighten it.
5) Test and Fine-Tune: After making these adjustments, test your brakes by squeezing the brake lever. The pads should engage the rim evenly, and there should be no unusual noises or rubbing. Fine-tune as necessary to achieve optimal braking performance.
6) Brake Pad Replacement: If your brake pads are worn down to the wear line or exhibit any signs of damage, replace them. New brake pads provide better braking power and safety.
Properly adjusted rim brakes can significantly enhance your biking experience, providing consistent and reliable stopping power. Remember that regular maintenance and periodic checks are essential to ensure your rim brakes remain in top condition.
Adjusting Disc Brakes
Disc brakes have gained popularity in the cycling world due to their superior stopping power and reliability, making them a common choice for many modern bikes. However, like all brake systems, they require occasional adjustments to maintain peak performance. Here’s a comprehensive guide on how to adjust disc brakes:
1) Caliper Alignment: Start by checking the alignment of the caliper. The caliper should be centered over the rotor, with an equal gap between the pads and the rotor on both sides. Loosen the caliper mounting bolts slightly and squeeze the brake lever to center the caliper. Retighten t)he bolts.
2) Brake Pad Replacement: If your brake pads are worn down to a thickness of 1mm or less, it’s time to replace them. Remove the retaining pin or bolt, slide out the old pads, and insert the new ones. Make sure they are properly aligned with the rotor.
3) Rotor Inspection: Examine the rotor for any signs of damage, warping, or contamination. If it’s damaged, replace it. If it’s contaminated with oil or debris, clean it with isopropyl alcohol and a clean cloth. A clean rotor is essential for optimal braking.
4) Cable Tension Adjustment: If the brake lever feels spongy or the pads don’t engage properly, you may need to adjust cable tension. Turn the barrel adjuster on the brake lever to fine-tune the tension until it feels just right.
5) Bedding-In New Pads: After replacing the brake pads, it’s important to “bed them in.” This process involves gradually applying the brakes to transfer pad material onto the rotor. Start with gentle, controlled stops and gradually increase the force. This ensures maximum braking performance.
6) Test and Fine-Tune: After making these adjustments, test your brakes. They should provide consistent and smooth stopping power without noise or vibration. Fine-tune as needed to achieve the desired feel.
Maintaining well-adjusted disc brakes enhances your safety and control when cycling. Regular inspection and adjustment help extend the life of your components and ensure reliable braking performance. Properly maintained disc brakes are essential for mountain biking, road cycling, and any other discipline where precise braking is a must.
Adjusting Drum Brakes
Drum brakes, though less common on modern bicycles, are still found on some cruiser and utility bikes. These enclosed brake systems have their unique features and require specific adjustment techniques. Here’s how to adjust drum brakes:
1) Disassembly: Begin by disassembling the hub to access the drum brake assembly. This may require removing the wheel from the bike and then disassembling the hub following the manufacturer’s instructions. Ensure your bike is securely supported and that you have a clean workspace.
2) Inspect Brake Shoes: Once you have access to the brake shoes, inspect them for wear. If they are worn down or damaged, replace them with new ones. Check for proper alignment and secure attachment to the brake backing plate.
3) Lubrication: Apply a small amount of high-temperature grease or brake assembly lubricant to the pivot points and moving parts. This ensures smooth operation of the brake shoes.
4) Tension Adjustment: Adjust the tension of the brake shoes. Some drum brakes have an adjustable tension screw or bolt that can be used to set the desired level of tension. Follow the manufacturer’s recommendations for proper tension.
5) Reassembly: Reassemble the hub and wheel, following the manufacturer’s instructions in reverse order. Make sure all parts are properly seated and tightened.
6) Test and Fine-Tune: After reassembly, test your brakes by squeezing the brake lever or using your bike’s handbrake. The brake shoes should engage smoothly and provide effective stopping power. Fine-tune the tension or alignment as needed for optimal performance.
Drum brakes, while less common, offer consistent and reliable stopping power with low maintenance. They are a great choice for bikes used in wet or dirty conditions since they are less susceptible to contamination compared to rim and disc brakes. Proper adjustment and maintenance of drum brakes ensure they continue to function effectively.

Hide-A-Bike Installation Guide
If you want to put together a Hide-A-Bike kit for yourself, just download these easy to follow, step-by-step directions, complete with a full hardware and parts list.
Conclusion
Your bicycle’s brakes are its most critical safety feature, and maintaining them in optimal condition is essential for a smooth and secure ride. We’ve explored the adjustment processes for various types of bicycle brakes, including rim brakes, disc brakes, and drum brakes. Armed with the right tools, knowledge, and a bit of practice, you can keep your brakes performing at their best.
Regular brake maintenance and adjustments are not only about safety but also about ensuring an enjoyable and worry-free cycling experience. By following the steps outlined in this guide, you’ll be well-equipped to tackle any brake adjustment task with confidence, enhancing your biking adventures and safety on the road. Happy and safe cycling!
Share This Article With A Friend
Did You Read This Whole Article?

You deserve a gift! Enter your email to receive a FREE copy of the Hide-A-Bike Installation Guide! And once a month we will send you a newsletter with the best deals on the internet for bicycle gear and accessories.
About Hide A Bike

Save space by keeping your bike flat against the ceiling with the original easy and convenient bicycle storage solution.
Thank You For Visiting!

You deserve a gift! Enter your email to receive a FREE copy of the Hide-A-Bike Installation guide. And once a month we will send you a newsletter with links to our best finds on bicycle gear and accessories.
Share This Article:
Most Popular Articles:
Article Categories:
Related Articles:


How To Clean Your Bicycle Properly


